Module-3: Jenkins and CI/CD Tools
(Jenkins, Github Actions, Azure DevOps)
1. Create an EC2 instance using Terraform Jenkins Pipeline. The terraform state for the EC2 should be created on S3.
Step 1: Setup Jenkins
Install Jenkins on your server.
Configure Jenkins with necessary plugins, including the AWS Credentials plugin.
Install Terraform on Jenkins EC2 instance.
Step 2: Configure AWS Credentials in Jenkins
In Jenkins, navigate to "Manage Jenkins" > "Manage Credentials."
Add a new AWS credential with the required access and secret key.
Step 3: Create a New Jenkins Pipeline Job
Create a new pipeline job in Jenkins.
In the job configuration, set up the pipeline script to be fetched from your GitHub repository.


(For source code feel free to check my GitHub repo: github.com/pavankumarindian/Jenkins-Terrafo.. )
Step 4: Customize Environment Variables
- Replace placeholders in the pipeline script (your_aws_region, your_s3_bucket_name, etc.) with your specific AWS and Terraform configuration.
Step 5: Run the Jenkins Pipeline
Run the Jenkins pipeline job.
Observe the console output for Terraform initialization, apply, and resource creation.


Step 6: Verify EC2 Instance
Go to your AWS Management Console.
Confirm the creation of the EC2 instance with the specified configuration.


2. Have a separate Pipeline for Terraform destroy to terminate the resources created in the above step.
Step 1: Create a New Jenkins Pipeline Job
Create a new pipeline job in Jenkins.
In the job configuration, set up the pipeline script to be fetched from your GitHub repository.


Step 2: Customize Environment Variables
- Replace placeholders in the pipeline script (your_aws_region, your_s3_bucket_name, etc.) with your specific AWS and Terraform configuration.
Step 3: Run the Jenkins Pipeline
Run the Jenkins pipeline job for resource termination.
Observe the console output for Terraform initialization, destroy, and resource termination.

(For source code feel free to check my GitHub repo: github.com/pavankumarindian/Jenkins-Terrafo.. )
Step 4: Verify Resource Termination
Go to your AWS Management Console.
Confirm the termination of the EC2 instance and related resources.

3. Using thin backup Plugin, backup and restore Jenkins to a different instance and make sure the Jobs are running fine.
Firstly launch an ec2 instance and install Jenkins on it.
Install Thin Backup Plugin:
Go to "Manage Jenkins" > "Manage Plugins."
Navigate to the "Available" tab and search for "Thin Backup."
Install the Thin Backup Plugin and restart Jenkins.
Then follow the below steps:
Open Jenkins instance terminal
cd
cd /
ll
sudo mkdir jenkins-backups
sudo chmod 777 jenkins-backups
cd jenkins-backups
pwd
copy the path and copy it to backup directory in Thin Backup settings and fill the required columns as shown below now save and click on Backup now.
Configure Thin Backup:
Go to "Manage Jenkins" > "Configure System."
Scroll down to the "ThinBackup" section.
Set the backup directory to a location where you want to store your backups.


Upload to AWS S3:
Make sure you have the AWS Command Line Interface (AWS CLI) installed.
Use the following command to upload the backup file to an S3 bucket: (create an s3 bucket(eg:pavanssonixbucket1) and create a folder(eg:jenkins_backups) in the bucket as shown below)
aws s3 cp /jenkins-backups/ s3://pavanssonixbucket1/jenkins_backups --recursive
or
aws s3 sync /jenkins-backups/ s3://pavanssonixbucket1/jenkins_backups
Download from AWS S3 on the New Jenkins Server:
On the new Jenkins server, install the AWS CLI.
cd
cd /
ll
sudo mkdir jenkins-backups
sudo chmod 777 jenkins-backups
cd jenkins-backups
Use the following command to download the backup file from S3:
aws s3 cp s3://pavanssonixbucket1/jenkins_backups /jenkins-backups --recursive
or
aws s3 sync s3://pavanssonixbucket1/jenkins_backups /jenkins-backups
Install the jenkins on the new instance.
Install thinbackup plugin.
Give the same details in Thin Backup settings as mentioned earlier in the old jenkins server then click save and apply
Perform Backup:
Go to "Manage Jenkins" > "ThinBackup."
Click on "Backup Now" to create a backup of the Jenkins configuration.
Your jenkins pipeline jobs and everthing will be restored in the jenkins dashboard.(It will take few minutes)
Install git and terraform on the new jenkins instance.
Now try running the pipeline jobs in the new jenkins instance.
(update the AWS credentials mentioned in the Credentials option in new jenkins dashboard if jobs are not running properly)
Perform Backup:
Go to "Manage Jenkins" > "ThinBackup."
Click on "Backup Now" to create a backup of the Jenkins configuration.
4. Create a Jenkins EC2 instance on Port 8081 and access it using a domain name. Ex: jenkins-dev.sonixtest. Use Route53 for domain management.
Jenkins-dev.sonixtest <-> <ip address> or Load balancer URL
Services used - Route53, EC2, Load balancer (Optional)
Launch EC2 instance and Install Jenkins:
Firstly launch an ec2 instance(amazon linux) and install Jenkins on it.
Install Jenkins:
sudo yum update –y
sudo wget -O /etc/yum.repos.d/jenkins.repo \
    https://pkg.jenkins.io/redhat-stable/jenkins.repo
sudo rpm --import https://pkg.jenkins.io/redhat-stable/jenkins.io-2023.key
sudo yum upgrade
sudo dnf install java-17-amazon-corretto -y
sudo yum install jenkins -y
sudo systemctl enable jenkins
sudo systemctl start jenkins
sudo systemctl status jenkins
In the "Configure Security Group" step, add a rule to allow incoming traffic on port 8081.
Open the Jenkins systemd service file for editing:
sudo nano /etc/systemd/system/multi-user.target.wants/jenkins.service
Look for the Environment line specifying the JENKINS_PORT. It should look like this:
Environment="JENKINS_PORT=8080"
Change the port number to your desired value. For example: Environment="JENKINS_PORT=8081"
Replace 8081 with the port number you want to use.
Save the changes and exit the text editor.
Reload the systemd configuration:
sudo systemctl daemon-reload
Restart Jenkins to apply the changes:
sudo service jenkins restart
Now Jenkins should be running on the new port. Access it through your web browser using http://<Public-ip-address>:<new_port>.
Configure Route 53:
Go to the AWS Route 53 console.
Create a Hosted Zone:

Create Record Set:
Inside the hosted zone, create a record set with your EC2 instance public IP.


Now copy the below values of NS as shown below.

Now open the Godaddy website and enter the above-copied Name Servers(NS).


Now click on save and wait for some time (it may took 2hrs to 48hrs. In my case it took more than 2hrs)
Access Jenkins through the Domain:
Now, you should be able to access Jenkins using

5. Build a Jenkins pipeline to deploy a Python flask application on an EC2 instance.
Pre-reqs
Setting up an ec2 instance.
Python 3.8+ - for running locally, linting, running tests etc
Docker - for running as a container, or image build and push
AWS CLI (aws configure) - for deployment to AWS.
Install make
Jenkins set up and installation.
Install the following plugins in Jenkins:
Project Repo: github.com/pavankumarindian/FlaskApp-Deploy..
Configure the docker tool as shown below.

Add docker hub credentials so that the docker image can be pushed or pulled from the docker hub.

Create a pipeline project as shown below.

Configure the pipeline job as shown below.


Click on Build Now. As you can see the pipeline jon run successfully.

You can see below that the docker image is created and pushed in the docker hub registry.

You can verify the deployment of the web app on the ec2 instance as follows:
<public-ip>:5000

6. Create a Jenkins Pipeline to set up a Sonarqube scanner for an existing Java code.

Project Repo: github.com/pavankumarindian/jenkins-sonarqu..
Steps:-
Step 1 — Create an Ubuntu(22.04) T2 Large Instance
Step 2 — Install Jenkins.
Step 3 — Install Docker. Create a Sonarqube Container using Docker.
Step 4 — Install Plugins like JDK, and Sonarqube Scanner.
Step 5 — Create a Pipeline Project in Jenkins using a Declarative Pipeline.
Now, let's get started and dig deeper into each of these steps:-
STEP1:Create an Ubuntu(22.04) T2 Large Instance
Launch an AWS T2 Large Instance. Use the image as Ubuntu. You can create a new key pair or use an existing one. Enable HTTP and HTTPS settings in the Security Group and open all ports (not best case to open all ports but just for learning purposes it's okay).

Step 2 — Install Jenkins
Connect to your console, and enter these commands to Install Jenkins
vi jenkins.sh
#!/bin/bash
sudo apt update -y
sudo apt upgrade -y
wget -O - https://packages.adoptium.net/artifactory/api/gpg/key/public | tee /etc/apt/keyrings/adoptium.asc
echo "deb [signed-by=/etc/apt/keyrings/adoptium.asc] https://packages.adoptium.net/artifactory/deb $(awk -F= '/^VERSION_CODENAME/{print$2}' /etc/os-release) main" | tee /etc/apt/sources.list.d/adoptium.list
sudo apt update -y
sudo apt install temurin-17-jdk -y
/usr/bin/java --version
curl -fsSL https://pkg.jenkins.io/debian-stable/jenkins.io-2023.key | sudo tee \
                  /usr/share/keyrings/jenkins-keyring.asc > /dev/null
echo deb [signed-by=/usr/share/keyrings/jenkins-keyring.asc] \
                  https://pkg.jenkins.io/debian-stable binary/ | sudo tee \
                              /etc/apt/sources.list.d/jenkins.list > /dev/null
sudo apt-get update -y
sudo apt-get install jenkins -y
sudo systemctl start jenkins
sudo systemctl status jenkins
sudo chmod 777 jenkins.sh
./jenkins.sh    # this will installl jenkins
Once Jenkins is installed, you will need to go to your AWS EC2 Security Group and open Inbound Port 8080, since Jenkins works on Port 8080.
Now, grab your Public IP Address
<EC2 Public IP Address:8080>
sudo cat /var/lib/jenkins/secrets/initialAdminPassword

Unlock Jenkins using an administrative password and install the suggested plugins.

Jenkins will now get installed and install all the libraries.

Jenkins will now get installed and install all the libraries.

Create a user click on save and continue.
Jenkins Getting Started Screen.

Step 3 — Install Docker. Create a Sonarqube Container using Docker (another EC2 instance).
sudo apt-get update
sudo apt-get install docker.io -y
sudo usermod -aG docker $USER   #my case is ubuntu
newgrp docker
sudo chmod 777 /var/run/docker.sock
After the docker installation, we create a sonarqube container (Remember added 9000 ports in the security group).
docker run -d --name sonar -p 9000:9000 sonarqube:lts-community

Now our sonarqube is up and running

Enter username and password, click on login and change password
username admin
password admin

Update New password, This is Sonar Dashboard.

Step 4 — Install Plugins like JDK, and Sonarqube Scanner.
Goto Manage Jenkins →Plugins → Available Plugins →
Install below plugins
1 → Eclipse Temurin Installer (Install without restart)
2 → SonarQube Scanner (Install without restart)
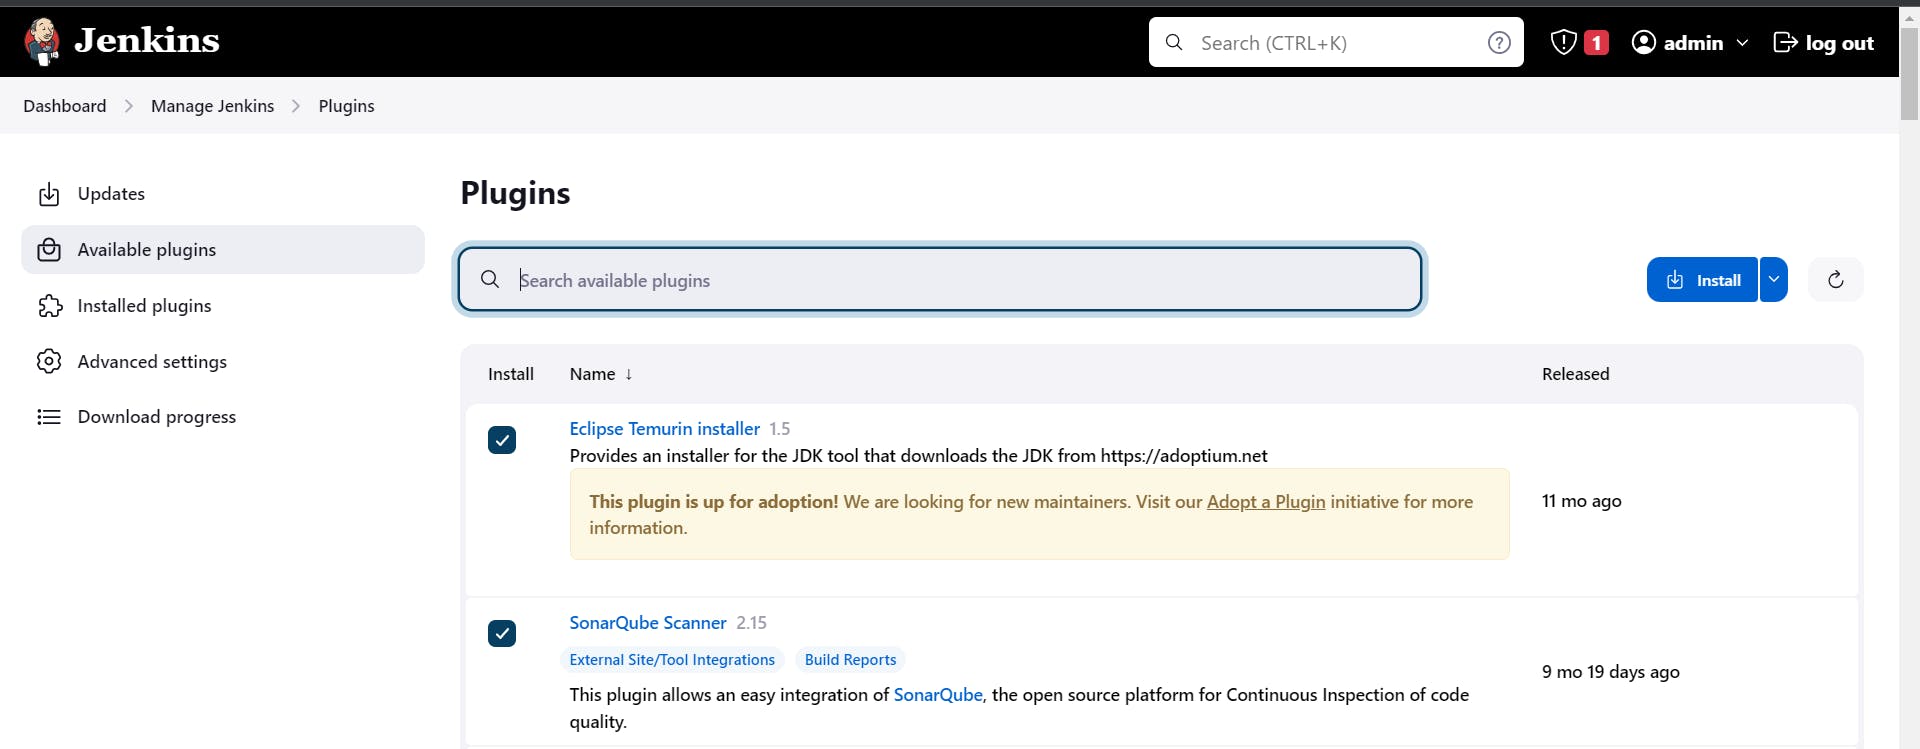
Configure Java and Maven in Global Tool Configuration
Goto Manage Jenkins → Tools → Install JDK(17) and Maven3(3.6.0) → Click on Apply and Save


Create a Job
Label it as PETSHOP, click on Pipeline and OK.

Configure Sonar Server in Manage Jenkins
Grab the Public IP Address of your EC2 Instance, Sonarqube works on Port 9000, so <Public IP>:9000. Goto your Sonarqube Server. Click on Administration → Security → Users → Click on Tokens and Update Token → Give it a name → and click on Generate Token

click on update Token

Create a token with a name and generate

copy Token
Goto Jenkins Dashboard → Manage Jenkins → Credentials → Add Secret Text. It should look like this
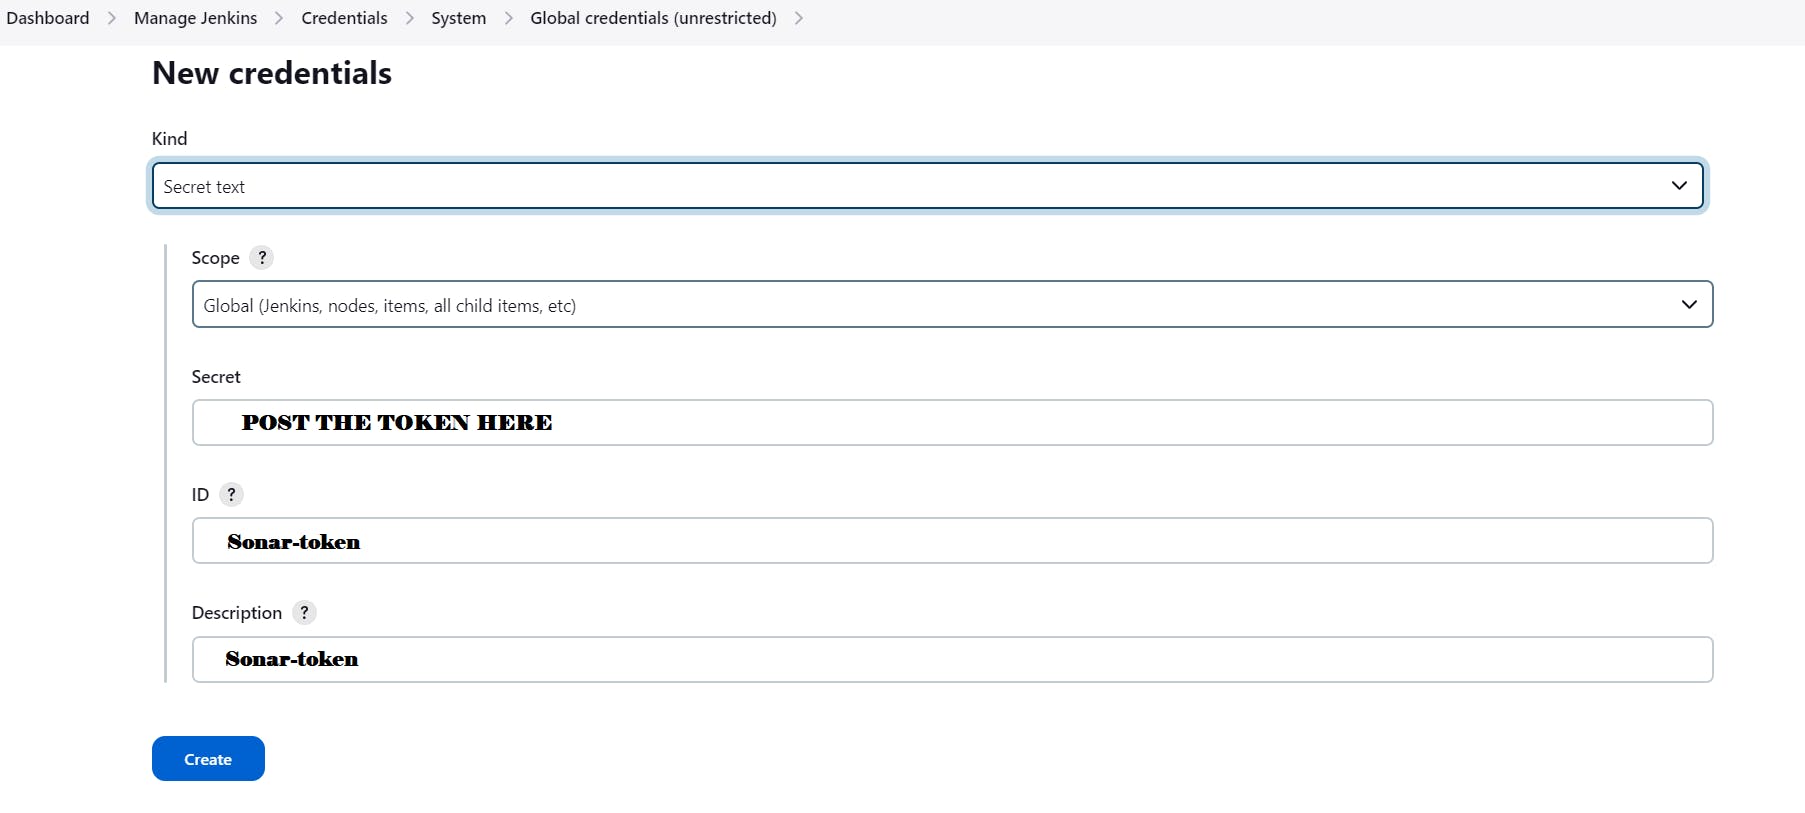
You will this page once you click on create

Now, go to Dashboard → Manage Jenkins → System and Add like the below image.
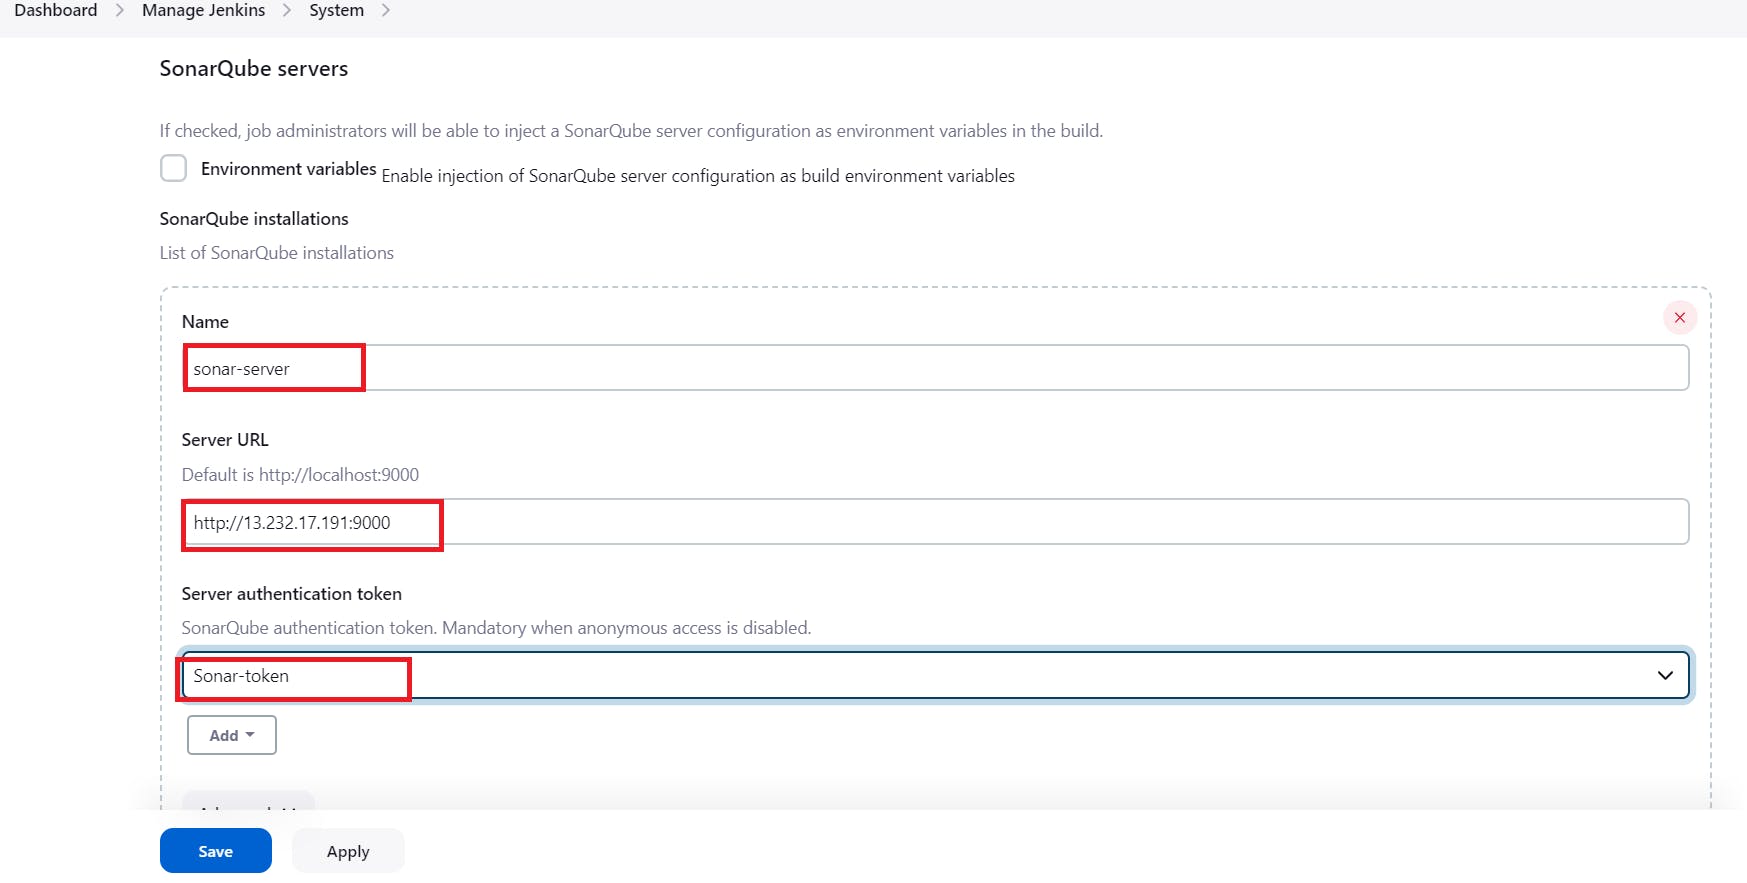
Click on Apply and Save
The Configure System option is used in Jenkins to configure different server
Global Tool Configuration is used to configure different tools that we install using Plugins
We will install a sonar scanner in the tools.
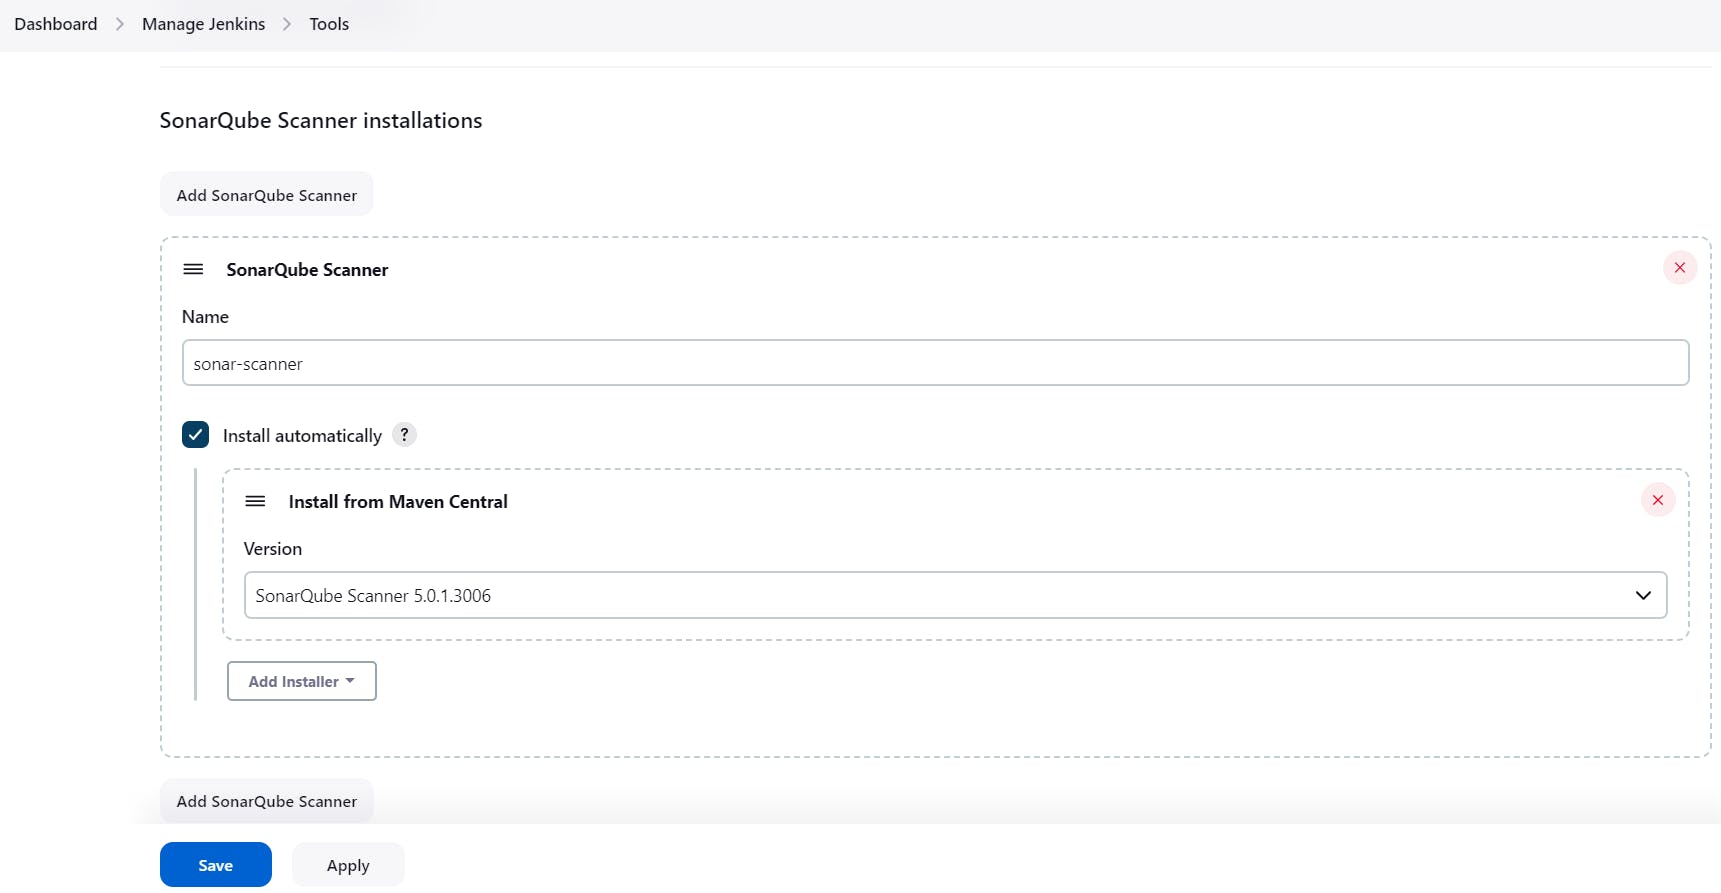
In the Sonarqube Dashboard add a quality gate also
Administration--> Configuration-->Webhooks
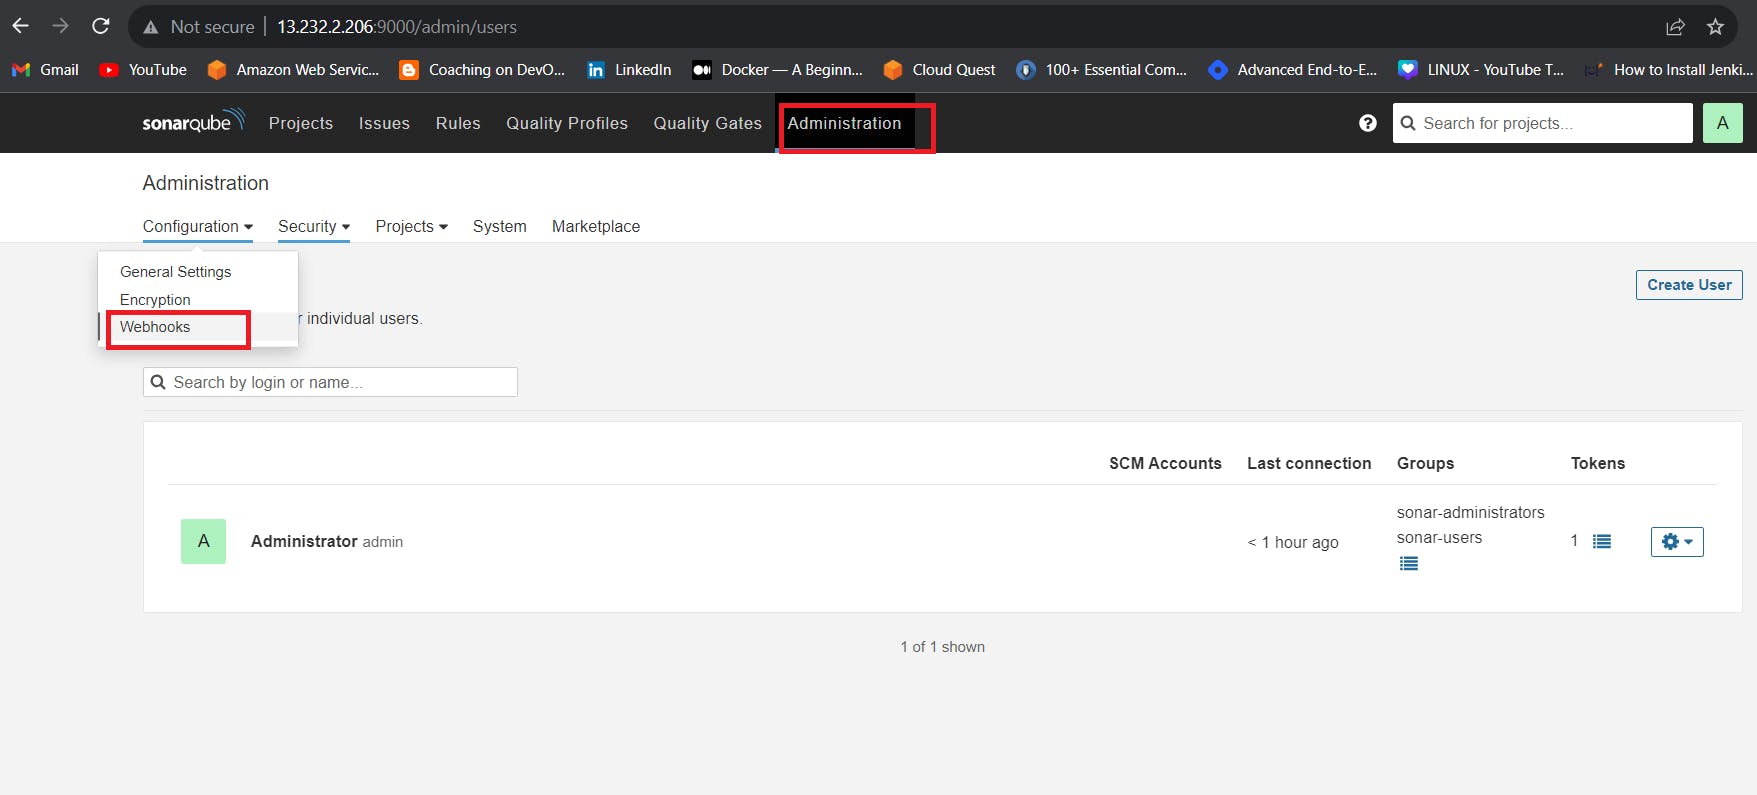
Click on Create

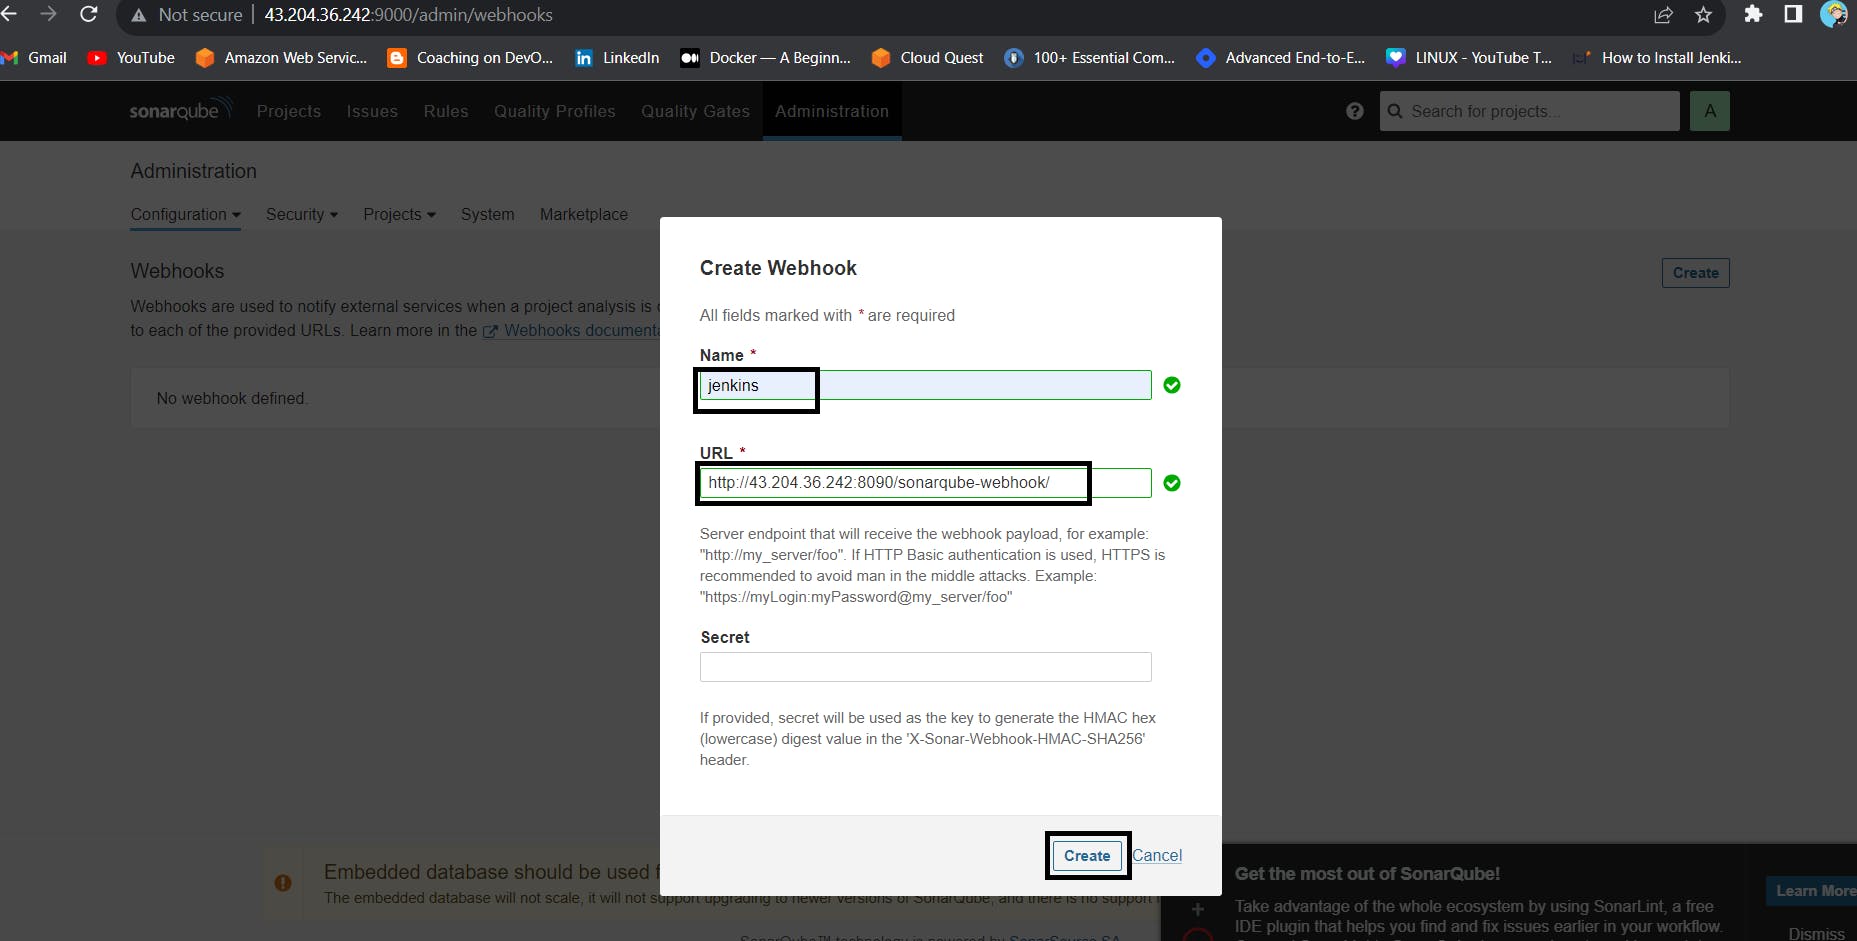
Add details
#in url section of quality gate
<http://jenkins-public-ip:8090>/sonarqube-webhook/
Step 5 — Create a Pipeline Project in Jenkins using a Declarative Pipeline.
Enter this in Pipeline Script,
pipeline{
    agent any
    tools {
        jdk 'jdk17'
        maven 'maven3'
    }
    environment {
        SCANNER_HOME=tool 'sonar-scanner'
        SONAR_HOST_URL = 'http://52.66.24.161:9000'
        SONAR_TOKEN = credentials('Sonar-token')
    }
    stages{
        stage ('clean Workspace'){
            steps{
                cleanWs()
            }
        }
        stage ('checkout scm') {
            steps {
                git 'https://github.com/Aj7Ay/jpetstore-6.git'
            }
        }
        stage ('maven compile') {
            steps {
                sh 'mvn clean compile'
            }
        }
        stage ('maven Test') {
            steps {
                sh 'mvn test'
            }
        }
        stage("Sonarqube Analysis "){
            steps{

                sh ''' $SCANNER_HOME/bin/sonar-scanner -Dsonar.projectName=Petshop \
                -Dsonar.java.binaries=. \
                -Dsonar.projectKey=Petshop '''
                }

        }
   }
}
Click on Build now, you will see the stage view like this

To see the report, you can go to Sonarqube Server and go to Projects.


You can see the report has been generated and the status shows as passed. You can see that there are 6.7k lines. To see a detailed report, you can go to issues.
7. Use Github actions and create a pipeline to deploy the war file to a Tomcat server.
Firstly launch an ec2 instance and install the Tomcat server on it as shown below:
Tomcat Setup on Ubuntu-
Create an EC2 machine with Ubuntu as OS.
cat /etc/os-release
apt update
apt-get install tomcat9
service tomcat9 status
You can check the port details here -
/etc/tomcat9/server.xml
apt-get install tomcat9-admin
Add new user for tomcat-admin
vi /etc/tomcat9/tomcat-users.xml
<user username="sonixdev" password="sonix123" roles="manager-gui,manager-script,manager-status"/>
- service tomcat9 restart

Project Repo: github.com/pavankumarindian/GitHubActions-W..
Create a repo on your GitHub account and push your source code and pipeline code or click on actions and create new workflow in your repo

Open your project repo > Settings > Secrets and variables > actions > add your variables in Repository secrets as shown below.


Now click on your workflow and run the job to deploy

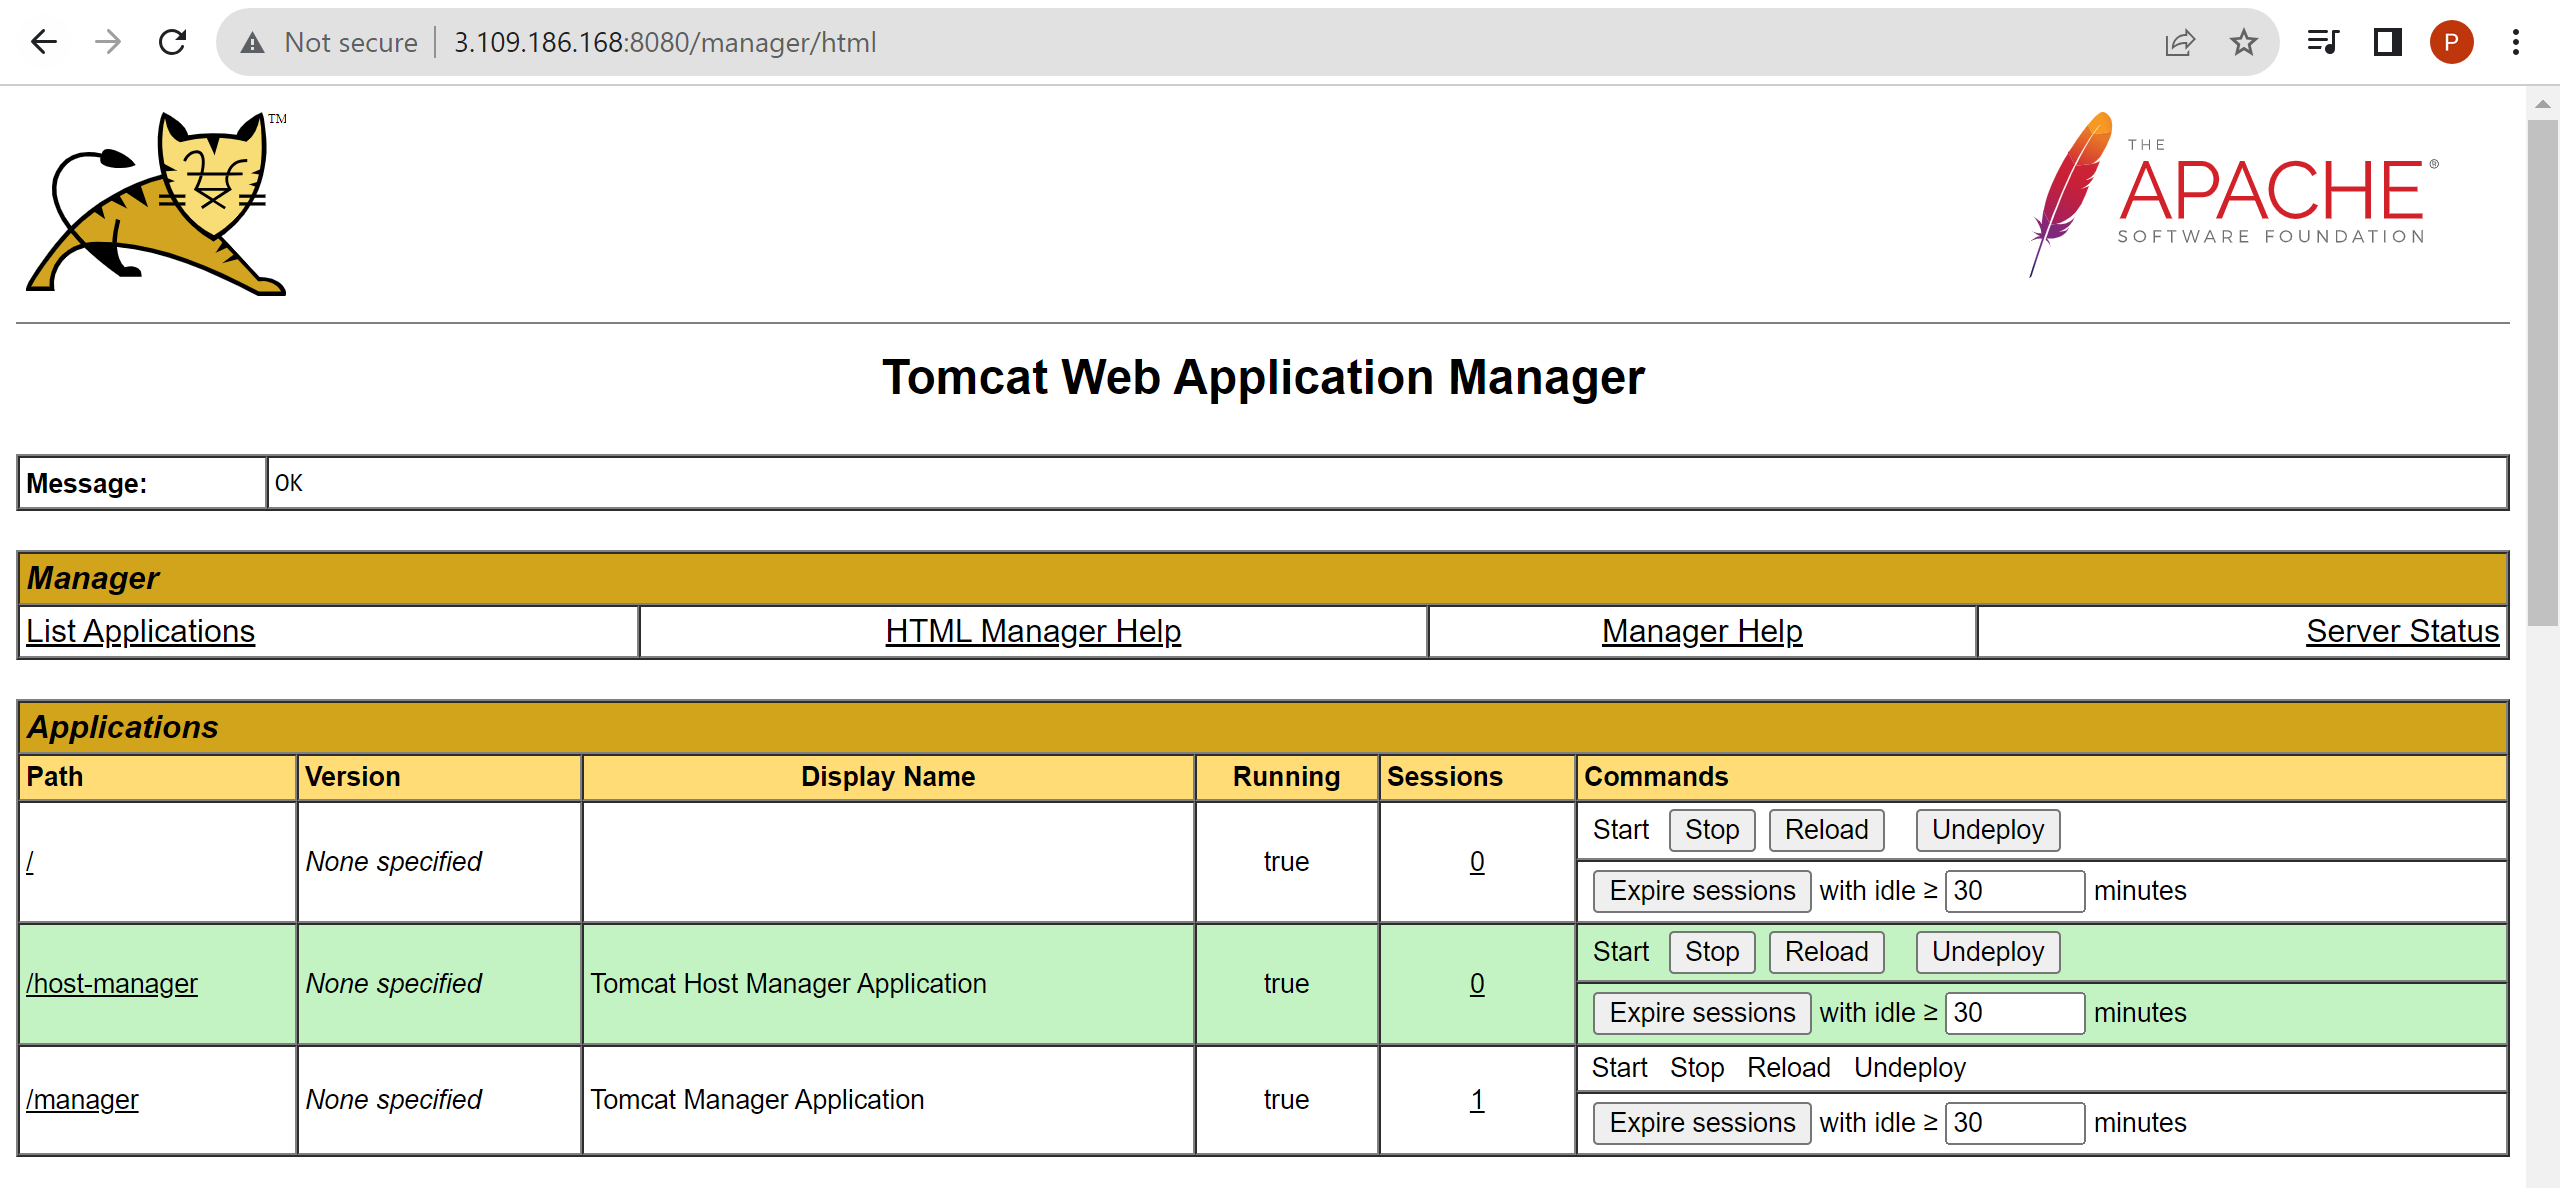
Now you can check the war file deployment in Tomcat server as shown below.

Java web application is deployed on the Tomcat server as shown below.

8. Use GitHub actions and create a pipeline to create an EC2 instance on AWS using Terraform.
Project Repo: github.com/pavankumarindian/aws-ec2-terrafo..
Create a repo on your GitHub account and push your source code and pipeline code or click on actions and create new workflow in your repo.

Open your project repo > Settings > Secrets and variables > actions > add your variables in Repository secrets as shown below.


Now click on your workflow and run the job to create an ec2 instance in AWS console

You can observe below, the ec2 instance is created in AWS console

9. Use Azure Pipelines and create a pipeline to deploy the war file to a Tomcat server.
Firstly launch an ec2 instance and install the Tomcat server on it as shown below:
Tomcat Setup on Ubuntu-
Create an EC2 machine with Ubuntu as OS.
cat /etc/os-release
apt update
apt-get install tomcat9
service tomcat9 status
You can check the port details here -
/etc/tomcat9/server.xml
apt-get install tomcat9-admin
Add new user for tomcat-admin
vi /etc/tomcat9/tomcat-users.xml
<user username="sonixdev" password="sonix123" roles="manager-gui,manager-script,manager-status"/>
- service tomcat9 restart
Project Repo: github.com/pavankumarindian/AzureDevops-mvn..
Open Azure account (https://dev.azure.com/)
Create a New Project (eg: AzureDevops-WebAppDeployment)
Open https://marketplace.visualstudio.com/azuredevops
Install the AWS Toolkit for Azure DevOps extension (plugin) from the above link.
Open project > Project settings > Service connections > New service connection

Fill the below details and save the AWS credentials.

Enter the yaml script using tasks as shown below.

Fill the variables as shown below.

Now run the pipeline job,

Now you can check the war file deployment in the Tomcat server as shown below.

The web application is deployed on the Tomcat server as shown below.

10. Use Azure Pipelines and create a pipeline to create an EC2 instance on AWS using Terraform.
Project Repo: github.com/pavankumarindian/aws-ec2-terrafo..
Open Azure account (https://dev.azure.com/)
Create a New Project (eg: AzureDevops-WebAppDeployment)
Open https://marketplace.visualstudio.com/azuredevops
Install the AWS Toolkit for Azure DevOps and Terraform extensions (plugins) from the above link.
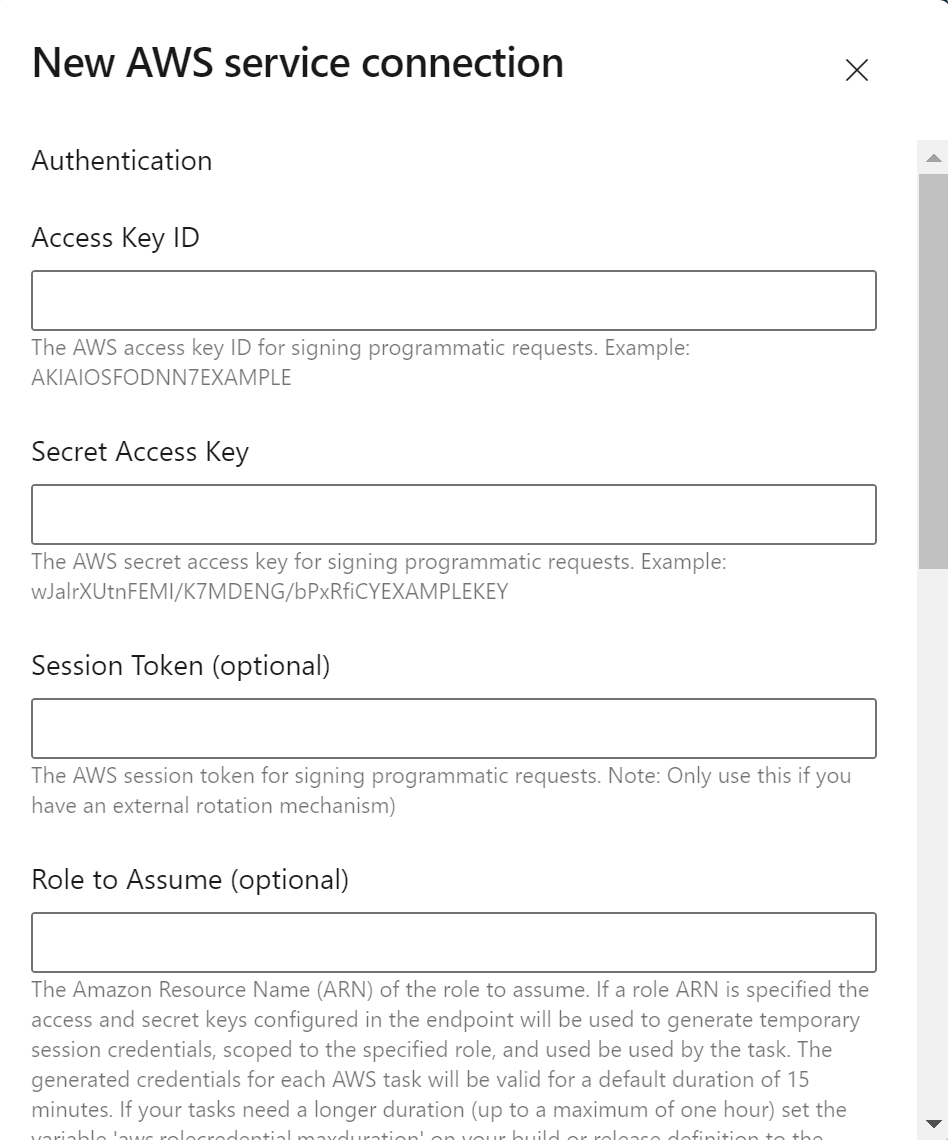
Open project > Project settings > Service connections > New service connection
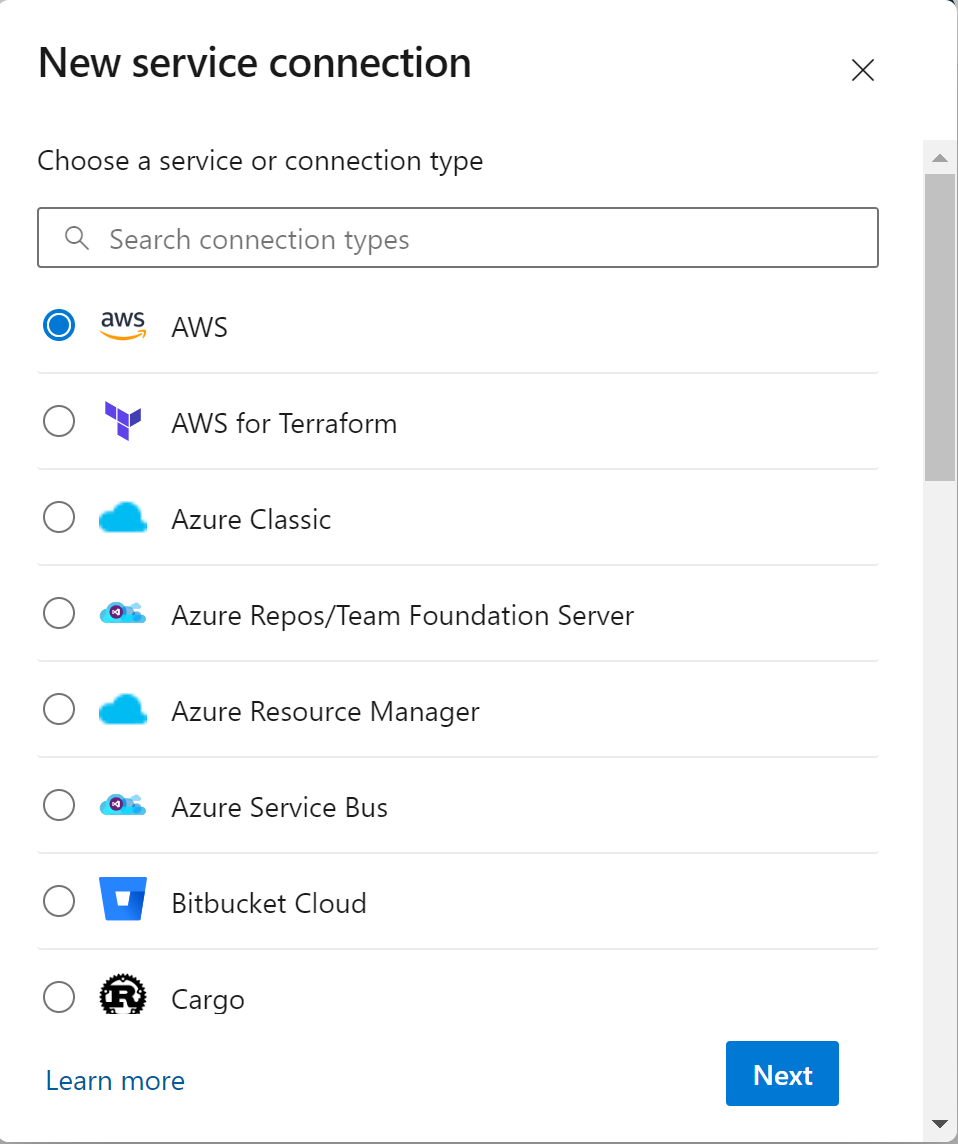
Fill the below details and save the AWS credentials.
Enter the yaml script using tasks as shown below.

Fill in the variables as shown below.

Now run the pipeline job,

Now you can check the ec2 instance is created in the AWS console as shown below.
